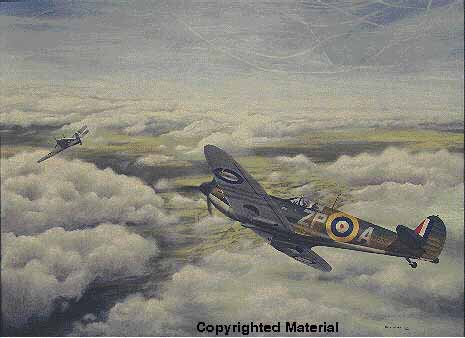

Rouge: "If you lose sight of your NME but he has sight of you .. Your dead. Plain and simple!"
Nits: "SA is the single most important factor in determining success or failure in the "air." It has been called The ClueBird, or The Ace Factor..."
Yoda's motto: "Lose sight and Lose the fight"
Snowman: "You need to know you are being attacked before you can defend against it. This requires good SA (Situational Awareness). Be on the lookout for any dots higher than you. Watch relative motion for clues to the direction of the dot's travel. Don't depend too much on radar to give you warning..."
Boa: "If you're consistently surprised to see someone on your tail, you need to learn SA. There is no such thing as surprise to a perceptive, aware pilot."
SITUATIONAL AWARENESS.
What is it?
I have read many presentations on the subject and it is a very broad and evasive subject. SA can be anything from you watching your altitude to checking for vultures as you take off from an airfield to overhearing a dweeb blurting out his countrys plans over channel 1 before anyone can stop him.
I'm not going to go into all these subjects because if I did this would be a 6 month course and I don't think I really feel like typing that much. Instead I'm going to focus on how to operate your radar, use your different views to follow enemy planes and watch your 6, and overall how not to get caught by surprise. The last thing covered will be a few things about advanced SA and other things you need to be aware of.
What do you need it for?
Well basically SA is needed if you plan to do anything in the game other than get shotdown. Notice I didn't ask what you want it for because being aware of the enemy and his limitations and yours is not something you want it is something you NEED! Of course if you feel you don't need to be aware of the enemy please be my guest as I can always use a couple of extra kills and the easiest enemy to shoot down is the enemy that's not aware of my presence.
[Boa's Note: This is one of the best classes on Situational Awareness that I've ever seen. Take time to read this and go through the films provided. A big round of applause to Paradog for putting together this excellent document!]
I am begining this course with views as it is the single most important tool to you in being aware of your surroundings. While your radar may fail and your radio may scroll so quickly that a speed reader couldn't read it, your views are totally under your control and - excluding a few warping dweebs - if you see it using views it must be true. Also your views are important to you in combat as you need to know how to use them to stay on the enemys tail while simutaneously checking your 6 for enemy bogeys or gun happy countrymen.
Below you will find some tables on the various views and some cams with which to practice using your different views. Use these aids and I think the next time you fly online you will find your time was well spent.
Note on Hatswitches: While hatswitches are great and pilots who have them are truly blessed it is imperative that you too learn the keypad as a hatswitch cannot cover every possible view combination. If yours does then just ignore me but if it doesn't, learn the views.
The table below is meant to represent the keypad on your computer terminal and each button is labeled with its function. These are your basic keypad views. They are extremely simple and it is important that you learn each one as you will need to know these for two and three key combination views.
| 7 | 8(up Arrow)- Look Forward |
9 |
| 4(Left Arrow)- Look Left |
5- Straight Up View |
6(Right Arrow)- Look Right |
| 1 | 2(Down Arrow)- Rear View |
3 |
| 0(ins Key)- Look Down |
Note: There are also Keyboard commands and are as follow:G=Look Forward H=Look Left K=Look Straight Up L=Look Right J=Look Down M=Rear View. The keyboard commands can be used in combinations just like the keypad commands.
[Boa's Note: The 7 and 9 keys are the rudder, and the 1 and 3 the flaps. This means you can control all the action with one hand from the keypad.]
These are 2 key combinations and it is essential you learn them as they are necessary to both follow the enemy and to watch your 6. The only thing good about NOT using 2 key combinations is that you won't have to worry about landing. These key combinations are a must for any pilot in AW so use them!
| 7 | 8 | 9 |
| 4 | 5 | 6 |
| 1 | 2 | 3 |
| 0 |
| 7 | 8 | 9 |
| 4 | 5 | 6 |
| 1 | 2 | 3 |
| 0 |
| 7 | 8 | 9 |
| 4 | 5 | 6 |
| 1 | 2 | 3 |
| 0 |
|
Forward/Right View |
|
Forward/Left View |
|
Forward/Up View |
| 7 | 8 | 9 |
| 4 | 5 | 6 |
| 1 | 2 | 3 |
| 0 |
| 7 | 8 | 9 |
| 4 | 5 | 6 |
| 1 | 2 | 3 |
| 0 |
| 7 | 8 | 9 |
| 4 | 5 | 6 |
| 1 | 2 | 3 |
| 0 |
|
Rear/Left View |
|
Rear/Right View |
| Rear/Up View |
| 7 | 8 | 9 |
| 4 | 5 | 6 |
| 1 | 2 | 3 |
| 0 |
| 7 | 8 | 9 |
| 4 | 5 | 6 |
| 1 | 2 | 3 |
| 0 |
| Up/Left View |
| Up/Right View |
Note: Using the 0 key there are at least 4 other two key combinations and 4 three key combinations. I'm sure they could be useful especially at high altitude. The only reason I didn't put them in table form is that it is more important that you learn the combinations above as I believe they will be your bread and butter while 0 key combinations are more like icing on the cake. Once you have the combinations above down feel free to experiment with two and three key combinations as you never know where the enemy may rear her ugly head.
Download this package containing 3 SA training films by Boa, contents are listed below: CLICK TO DOWNLOAD cmc105.zip (SA training cams)
[Boa's Note: watch these films and use the views discussed above to keep the enemy in sight. Did you lose sight of the enemy? Try again. Keep doing this until you can go through an entire film following the enemy around with the view keys. Don't go to the next film until you're comfortable with the current one. By the time you view the third film, you should be able to go through the whole thing without losing sight of the other plane.
Using the view keys should be as second nature as turning your head is in real life. If you have to think about what key combination to use, you've just given a small edge to the enemy. Note this applies to hat-equipped joysticks as well.]
Radar is based at each individual airfield's Tower and covers whatever the Arena is set to which is usually about 17,000 yards.(in full realism range will be significantly shortened) Planes flying flying below 200 feet cannot be detected by radar at ranges over 5,000 yards.
Hitting F10 will toggle your radar map display off and on. When on you will see a map with grid overlay. The grid divides the map into sectors and each of these sectors represent 12.5 miles of virtual airspace. As you fly the grid will scroll beneath you and you can use your radar/map display to determine your location as you are always represented by the white cross in the center of the screen. Your radar/map display serves as both a navigational tool and an early warning system. Airfields are labeled on this map and information about enemy and friendly planes is often available.
[Boa's Note: keep in mind that while the map view is up, time is still rolling on. Since this is a class about awareness, be "aware" that you can be shot down while you're using the map, sending/reading radio messages, picking your toes, whatever. Stay alert at all times and you'll stay alive longer!]
Radar counters are the colored boxes you see in the upper left hand corner of each sector. These boxes are Not actual locations of aircraft. They are counters and they tell you how many pilots are in any given sector. They will be colored either orange for enemy planes or your countries color for friendly planes. Sometimes you will see a really big box. This big box represents 10 enemy planes in a sector with any additional smaller boxes added to that number. For instance one big block and three small blocks would mean there are thirteen aircraft in that sector. You can determine how many of these planes are friendly or enemies by the colors of the various boxes.
If enemy is within 17,000 yards of you and your country's radar it will appear as a tracking icon. The icon will appear on both the tactical display surrounding your radar screen and on the screen itself as a shotline, colored to reflect its nationality.The former reports distance from you and the latter reports position.Player CPID if friendly or plane type if enemy will also be displayed and is useful information for you as it will help you determine what course of action you are going to take next. If your country's radar has been destroyed or you are out of range tracking icons will not appear. Planes can be displayed as icons or numbers depending on the selections you made in preflight setup.
Your radar can track a maximum of 12 aircraft at one time. Biased view modes allow you to decide which sort of aircraft you wanna track. Unbiased mode tracks the 12 nearest plane whether friendly or enemy and is usually fine. Enemy biased mode tracks the 12 nearest enemy planes giving enemy planes priority over any nearby friendlys and is useful when lots of pilots are in the same sector. Friendly biased mode tracks the 12 nearest friendly planes giving friendlys priority and is useful for formation flying or finding squadmates. Bomber biased mode gives priority to any nearby bombers whether they're friendly or enemy and is useful for tracking enemy bombers or flying escort.
COMMAND LINES FOR RADAR BIAS MODE (Follow with <ENTER>)
Energy and potential energy are two things you need to be aware of in the game as it is important for you to know what it is, how to measure yours and your opponents, and how to use it to your advantage. I am not gonna go into the last two as there are other courses where you will learn how to use it but I am going to explain what it is and how to measure it.
ENERGY-is how much energy you have stored
and can be measured by your airspeed.
 It
is important you keep an eye on Airspeed as it could play critical role
in whether or not you survive encounters with the enemy. When tailing or
running from an enemy you can often judge their E by watching how fast
the distance is closed/open between you by using either views or radar
depending on how close they are. If you can determine how much E an enemy
has you may be able to use this information to your advantage. Their are
other courses in the academy that will teach you to do this.
POTENTIAL ENERGY-is how much energy you
are capable of gaining quickly and can be measured by your altitude.
 Potential
Energy is turned into Energy by diving and can be used to catch fleeing
enemys, make getaways or used to perform advanced maunuevers. Judging an
enemys potential E is done much the same as judging their E except you
should know that if enemy appears close on the radar/map but their distance
says otherwise they may be high overhead or way below you so keep this
in mind when judging potential E.
Landing Gear Up or Down-If your gear is down it will create drag causing your E to be burned up more rapidly. Drag will also affect the turn rate of your plane.
Plane Load-Whether or not you are carrying bombs can affect how your plane performs. How much fuel you are carrying can also affect this. Remember everything you carry is weight which will take away from your planes ability to climb and turn sharply. You should try to match the load to the mission. For instance their would be no reason to take 100 percent fuel or bombs on a flight if you knew that you would be dogfighting immediately upon take off.
WEP and Throttle-Always be aware of WEP and where your throttle is set. If you got shot down because you couldn't get that little extra E maybe you weren't aware of your WEP or maybe you left it on and wasted it or maybe your throttle was set to 40 percent from that bomber you shot down back there. Be Aware!
Rudder and Flaps-Why did my plane keep wanting to go right? Do I need to recalibrate? Whats wrong with this plane why won't it go? NO you don't need to recalibrate and nothing is wrong with your plane. What you need to do is check your rudders and flaps. If you had been paying attention you would have noticed you accidentally hit your rudder when you were chasing that last enemy and you accidentally hit your flaps as you were watching him fall in on your 6 right before he shot you down. Keep an eye on your rudder and flaps.
Plane Types-Be aware of the different plane types,their strengths and weaknesses. Knowing what a plane can do, yours or the enemys can help you better assess what your tactical situation is and decide whether or not to engage the enemy or get outta Dodge. There are many places to learn about plane types and some of the other schools in our Flight School section may be a great place to start.
Often you'll see radio messages that appear in the country color of the player sending them. This means that the player is within the maximum radar range of your position. This does not mean that the player will appear on radar. Rather, if max radar range is set, for example, to 17,000 yards it means the colored radio message you recieved was broadcast within a 17,000 yard radius of your current position. Maybe you could use this information to hunt trash talking dweebs.
Based on an article of the same name by Boa who is CMCs fearless leader I have decided to elaborate on this subject a little bit.
Ever been flying around and you see an icon pop up on your screen but you can't spot that sucker anywhere? Ever been chasing an enemy and had the game get real choppy making it really hard to draw a bead on em? Well guess what? You can alleviate both of these problems by learning to toggle between detail levels.
What are detail levels you ask?
Detail level determines how much detail the Air Warrior program will draw inflight. The lower the detail level, the higher the frame rate. Thats straight outta da manual.
What does a higher frame rate mean for me?
Occasionally your game will get very choppy especially when over airfields, mountains, or factories. This is due to the fact that these areas have alot more lines for the AW program to draw. If you toggle to a lower detail level you'll find that game play will become much smoother and that enemy bogeys will become much easier to track.
What else are detail levels good for?
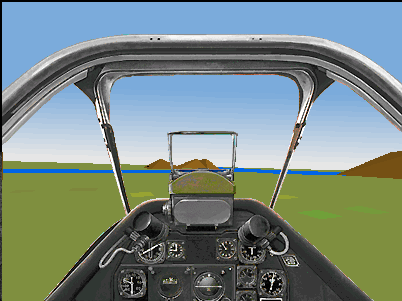
Now here is something the manual doesn't tell you but all the good pilots are well aware of. You can also use detail levels to more easily spot enemy bogeys. By going to the lowest detail settings objects such as mountains, airfields, and other obstructions to your view are removed making it much easier to spot potential enemy dots in the distance. You can always toggle back to a higher detail level if you need to spot a distant airfield for a bombing run and toggle back to a lower once your bombs are away. Below is an example of just what I'm talking about here.
Below is a picture of a distant bogey on the highest detail setting with all game details being drawn by the AW program. Can you spot the bogey in the distance? I can't but trust me he is there. Look at the mountain to the left and you may or may not be able to spot something.
Now here is the same picture on the lowest detail setting with all the obstuctions removed. Now I see something. Still kinda hard to see but remember this is a still picture and if you've a good eye you should be able to see em.
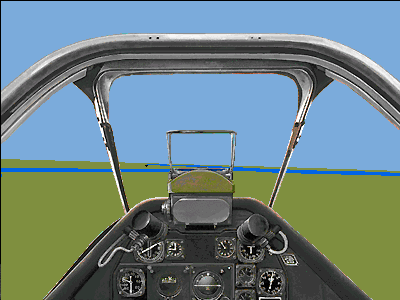
COMMAND FOR DETAIL LEVELS
Numbers 1-4 on your keyboard (Number 1 being the highest detail level and Number 5 being the lowest detail setting).
This concludes CMC 105:Situational Awareness. I've given you all the information you need but Situational Awareness is not something I can teach you it is something you must develop yourself. How you use this information will determine whether you are an average pilot or a great one. I probably have missed something but hey I,m only human and capable of making mistakes. I hope this has been an informative course and any comments or suggestions on how you think I can improve it would be greatly apprecciated. Hope to see you soon and you better use that rear view cause I'll probably be on your 6! HeHe.
If you have comments or questions about this class, e-mail Paradog or post on our public newsgroup
Last updated: 2/24/97
©1997 Erik Hastings aka "Paradog"